Local Management Portal Tutorials
Note
The Local Management Portal follows OpenBMC-style interfaces where applicable.
Default credentials and IP addresses are provided for initial setup—change them immediately for security.
Initial Setup & Login
Purpose
To help users access the Local Management Portal and configure the initial environment.
Configuration

Refer to the wiring diagram above and ensure:
- The ERMI module is correctly connected to the edge device and is receiving stable power, ensuring reliable operation.


ERMI module diagram
- To successfully test the Virtual Media feature, the following conditions must be met:
- ERMI Switch Configuration : Set Switches 1, 2, and 3 on the ERMI module to OFF.
- USB Connection to edge device : Connect the ERMI module to the edge device using a USB Type-C cable, plugged into edge device's USB port.
- Network Configuration: Ensure that the ERMI module, the remote control PC, and the Samba server are all on the same internal network domain (e.g., 10.1.xx.xx) to enable proper communication and file access.
Samba Server Setup (Optional Reference)
If you encounter issues while setting up the Samba server, refer to the following documentation ANNEX C – ERMI Services Installation Guide
Accessing the portal
The ERMI module comes with a default IP address of 192.168.1.200. (alternate IP: 169.254.9.168)
Version Update Notice
Starting from version 1.0.3.6, the default IP address of the ERMI module has been changed to 192.168.1.200. (alternate IP: 169.254.9.168)
If needed, reset the IP address by pressing and holding the reset button on the ERMI module for 2 seconds—an yellow LED will flash to confirm the reset.
- To access the login page and enable the SOL (Serial Over LAN) feature, open your browser and enter
https://[ERMI_IP]:8443(e.g., https://192.168.1.200:8443 or https://169.254.9.168:8443). - Since the device uses a self-signed certificate, your browser will display a security warning—click
Advancedand proceed to the site. - Then, enter
https://[ERMI_IP](e.g., https://192.168.1.200 or https://169.254.9.168)and again allow the self-signed certificate. - You should now be able to access the login page.

Alternative
You can add https://[ERMI_IP] and https://[ERMI_IP]:8443 to your browser’s list of allowed exceptions to bypass the certificate warning in future sessions.
Microsoft Edge

Firefox

Logging in as administrator
Note
The default username and password are both admin, and it is strongly recommended to change them immediately after the first login.
(For security, note that three failed login attempts within one minute trigger a 5-minute account lock.)

Operations
Device Information
Purpose
To provide a centralized view of the edge device and ERMI module details.

When to Use This Feature
- To verify device and ERMI module configuration after setup.
- To quickly access key information about the edge device or ERMI module status.
Device power operations
Purpose
To remotely control the edge device’s power state using Redfish API-based actions.
Note
If the operating system does not have the ERMI daemon properly installed and running, the system may fail to accurately report its current power state.
In such cases, the Serial over LAN (SOL) feature can be used to remotely access the system console and verify the edge device’s actual state, providing a reliable fallback for system diagnostics and troubleshooting.

The power on, force off,force restart, graceful shutdown provided by the Redfish API simulate hardware GPIO settings, and their behavior may vary depending on the edge platform in use.
For example, on Jetson-based systems, the graceful shutdown function simulates a press of the physical power button. This triggers the operating system to initiate a shutdown sequence, typically with a delay of approximately one minute before the actual power-off process begins.
When to Use This Feature
- To remotely manage the edge device’s power state.
- When troubleshooting or rebooting the device is required.
Stream Settings (Beta – Development Stage)
Streaming video from the edge device via the ERMI module (currently under development).
Serial over LAN (SOL)
Purpose
To remotely access the edge device’s system console for diagnostics and troubleshooting.
Steps
- Ensure Secure Connection: Verify access via
https://[ERMI_IP]:8443as described in Accessing the portal . - Refresh if Needed: If the console screen is black, press
Enterto refresh and display system status.

When to Use This Feature
- To troubleshoot or verify the edge device’s state when the ERMI daemon is not reporting correctly.
- For remote console access during diagnostics.
Virtual Media
Purpose
To mount an image from an external server to the edge device for software installation or updates.
Steps
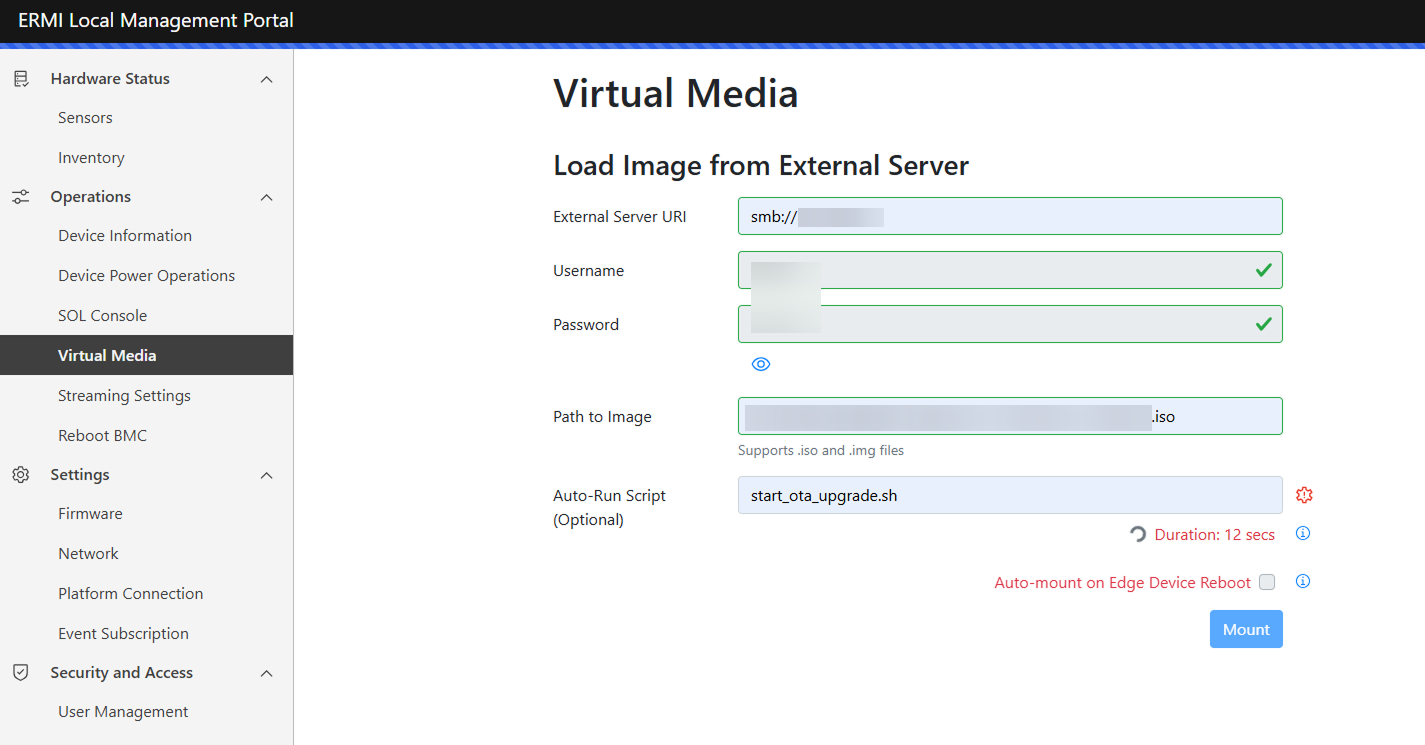
- Verify Configuration to ensure your setup is correct and that Virtual Media function is enabled.
Enter details:
- External Server URI: The server address hosting the image file
(e.g., smb://10.1.xxx.xxx). - Username / Password: Credentials used to access the server.
- Path to Image : The file path to the ISO image on the server
(e.g., ermi/d315_JP620_JP622.iso). - Auto‑Run Script (Optional): The name of a shell script
(e.g., start_ota_upgrade.sh)that is automatically executed after the image is mounted.
Important Notes
The Auto‑Run Script is executed as a system process. Script execution behavior—including completion status, failure handling, and execution duration—is entirely determined by the script logic itself.
Users must ensure that the script has undergone thorough reliability and stability validation before enabling this feature.
This option is primarily intended for automated upgrade scenarios, such as BSP OTA upgrades. For details on creating a BSP OTA ISO image, refer to Preserving Files During OTA.
When to Use This Feature
- To load software images or updates onto the edge device.
- When performing remote installations or recovery.
Case 1: Virtual Media without Auto‑Run Script
When the Auto‑Run Script is not specified:
The system performs image mounting only. A success response is returned immediately after the image is mounted successfully.
- Mount Image: Click
Mountand wait for a confirmation toast message. If successful, a toast message will appear. The button will change toUnmount, and all fields will be locked. You should now see a new USB device appear on your edge device.

Image mounted successfully via Virtual Media

Case 2: Virtual Media with Auto‑Run Script
When the Auto‑Run Script is specified:
After the image is mounted and the files are successfully transferred to the edge device, the system immediately starts executing the specified script.
The operation status transitions directly into background task execution.
The reported execution time reflects the mount operation duration, not the execution time of the script.
Settings
Firmware Update
Purpose
To update the ERMI module’s firmware to ensure optimal performance and security.

Steps
- Upload Firmware: Select and upload a compatible firmware file.
- Monitor LED Indicators: Check for green blinking (update in progress) and green solid (update complete).
Note
- Only compatible firmware files allowed; invalid files are rejected.
- Uploading the same firmware version results in an error.
When to Use This Feature
- To apply firmware updates for improved functionality or security patches.
- When directed by support to resolve specific issues.
LED lights Indicators
| LED Indicator | Color | Behavior | Status Description |
|---|---|---|---|
| Ethernet Indicator | Off | Network disconnected or abnormal | |
| Ethernet Indicator | Yellow | Solid | Network connected (Link up, data transmission active) |
| ERMI Power Indicator | Off | 1. Redfish service not started or abnormal 2. Firmware update completed |
|
| ERMI Power Indicator | Green | Solid | 1. Redfish service active 2. firmware file uploaded |
| ERMI Power Indicator | Green | Blinking (0.5s interval) | firmware update in progress |
Network Settings
Purpose
To configure the ERMI module’s network settings for connectivity and accessibility.

-
Modify Hostname: The hostname can be customized and will sync with the Fully Qualified Domain Name (FQDN) display.
-
Switch Between DHCP and Static IP:
- When using Static IP, fields such as IP address and subnet mask are editable.
- After applying changes, the page will automatically redirect.
When to Use This Feature
- To customize network settings for the ERMI module.
Platform Connection
Purpose
To integrate the ERMI module with third-party platforms for extended functionality.
Enter the API key to enable successful integration with third-party platforms. (e.g., cogniteam)

When to Use This Feature
- To enable integration with platforms like cogniteam for enhanced management.
- When directed by support or third-party platform requirements.
Event Subscription
Purpose
The Event Subscription feature enables users to configure event-based notifications from the ERMI system. Event data is automatically delivered to specified endpoints to support real-time monitoring.
Steps
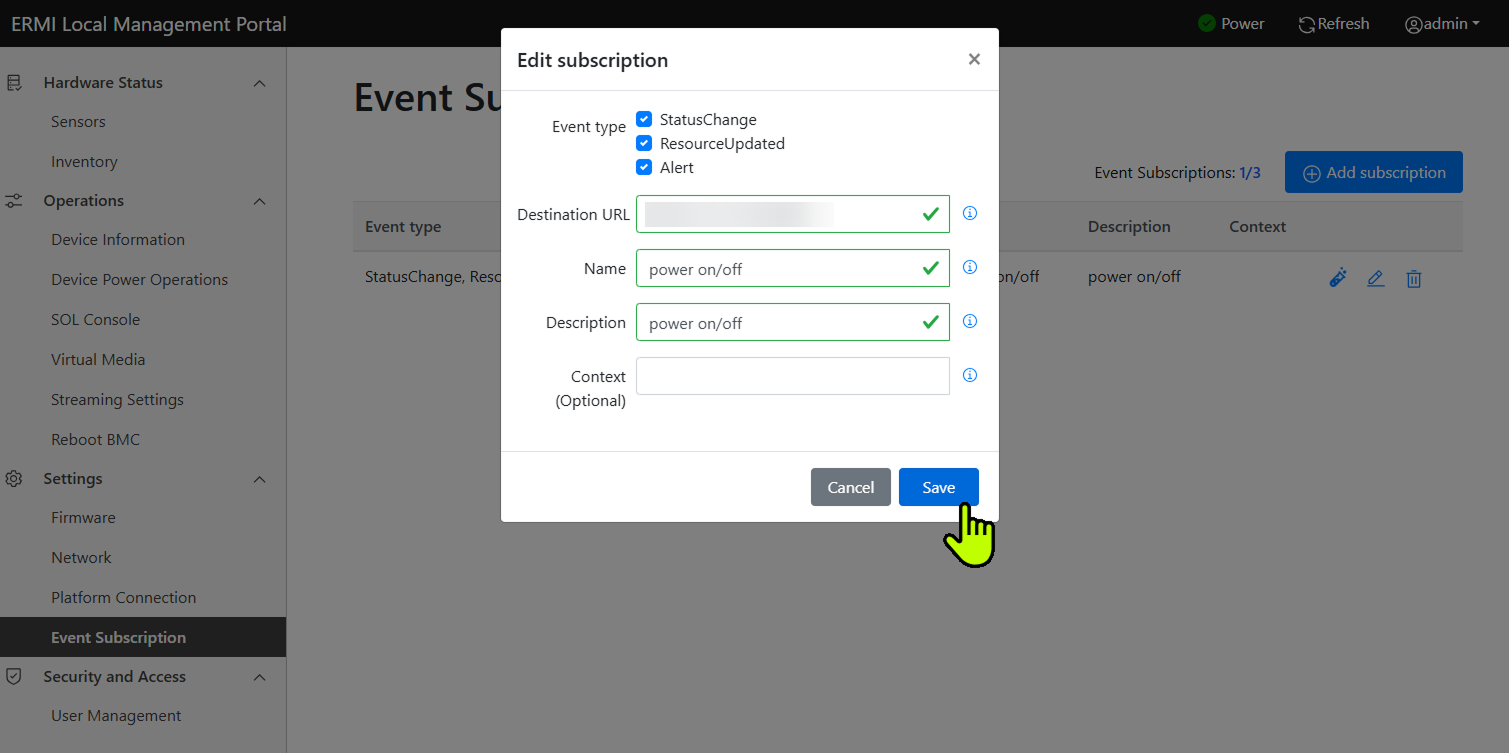
- Click the Add Subscription button.
- Select Event type
- ResourceUpdated: Triggered when system resources or configurations are modified, such as network (IP) updates, user account changes, or resource property updates.
- Alert: Triggered by security-related events, including login failures and intrusion detection.
- StatusChange: Triggered when the system power state changes, for example from On to Off.
- Enter the Destination URL, Name, Description, Context
- If you encounter issues when configuring the Destination URL, refer to ANNEX C – ERMI Services Installation Guide
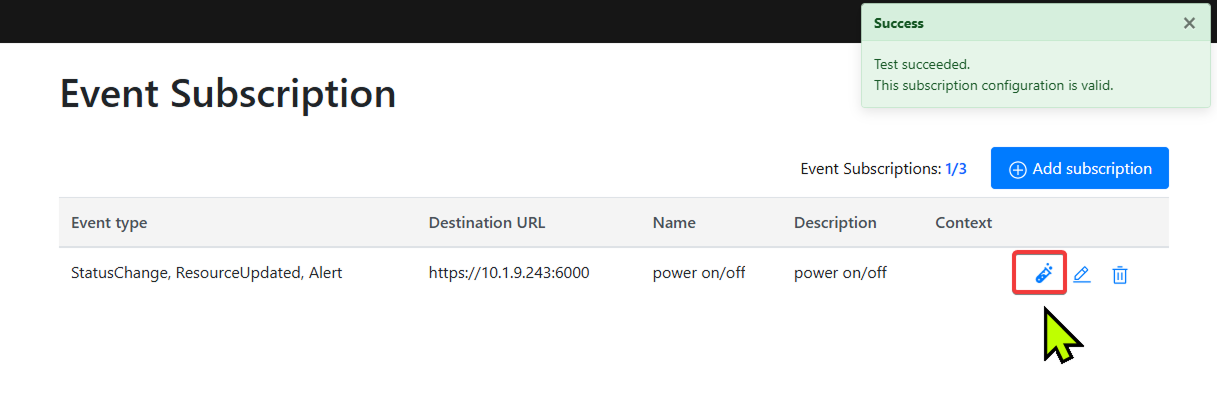
- Validate Subscription Status
Once created, the subscription appears in the Event Subscriptions list. You can use the Test function to verify that event monitoring is functioning correctly.
When to Use This Feature
- System Integration When integrating ERMI with third-party platforms such as monitoring systems, dashboards, or automation tools.
- Real-Time Event Notification When immediate notification is required for system events like status changes or alerts.
- Centralized Monitoring When aggregating events from multiple devices into a centralized log or alerting system.
User Management
Purpose
To manage user accounts and roles to secure access to the Local Management Portal.
Steps
- Manage Users: Create or edit up to 4 user accounts, assigning roles (
adminfor full access oroperatorfor limited device control- only operations functions). - Update Credentials: Change the default password
(admin/admin)immediately after login.

Note
Three failed login attempts within one minute trigger a 5-minute account lock.
When to Use This Feature
- To secure the portal by managing user access and roles.
- To update default credentials or add new users for team access.